

 |
 |
 |
Starting EasyCode
![]() Of course, there’s nothing to stop you coding the whole program from scratch, and I will cover that angle in a later chapter, but EasyCode will make the initial process of learning considerably easier. However, in programming – as in life, generally – there’s no such thing as a free lunch. EasyCode programs will be larger than those created entirely by hand (20K as opposed to 8K, or less, for the examples in this chapter) but this is trifling when offset against the productivity benefits of a visual coding environment.
Of course, there’s nothing to stop you coding the whole program from scratch, and I will cover that angle in a later chapter, but EasyCode will make the initial process of learning considerably easier. However, in programming – as in life, generally – there’s no such thing as a free lunch. EasyCode programs will be larger than those created entirely by hand (20K as opposed to 8K, or less, for the examples in this chapter) but this is trifling when offset against the productivity benefits of a visual coding environment.
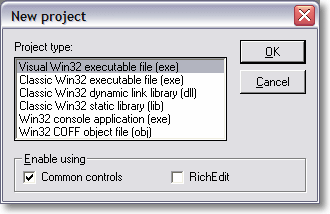
 I am assuming that you have installed the goAsm suite of programs and EasyCode itself so, let’s launch EasyCode by double-clicking its icon on the desktop. You should be presented with the “New Project” dialog shown here. Since we are always going to be using the visual environment, select the first option – “Visual Win32 executable file (exe)” – ensuring that the “Common controls” checkbox is ticked, as shown. It won’t do any harm if you also select “RichEdit” but, since we will not be discussing this feature until a later chapter, it’s a waste of resources right now. Leave it unchecked.
You should now be in the EasyCode environment proper. The illustration shown here points out the main features of the interface. Note, however, that this is not a book on EasyCode. I do not plan on delving into every nook and cranny of the thing – it comes with its own help files. We will examine its features as and when they are of use to us in learning how to program in assembly.
 |
 |
 |